Installing Sliding Wardrobe Doors
How to Install Sliding Wardrobe Doors
Video: How to Fit Sliding Doors
1. Cut the tracks
Carefully measure the width of the opening at top and bottom, and reduce the lengths measured by about 2-3 mm. Measure off the required track length, marking the future cut line on the tracks. Use a fine-toothed metal cutting saw to cut off the redundant part of the tracks.
Advice:The tracks to be installed should be about 50 mm longer than the opening width. This spare length will make it possible to avoid measurement errors and it is easy to trim. Take care not to damage the track surface while cutting. In order to facilitate top track cutting, insert 38 mm thick wood blocks or a reversed piece of track into the track. This will prevent track deflection during the cutting process.
2. Install the top track
Fix the top track with screws, offsetting its flat surface by 5 mm from the door face (inwards). Install the top track with the shade line facing forward in order to mask ceiling irregularities. If a multiple-track system is installed, fix the other tracks so that they fit tightly against each other along the entire length.
Advice: Before you start installation use a detector to make sure there is no electrical wiring at the screw fixing points. Avoid applying excessive force when tightening screws to prevent track deformation. Use flat-head screws for best results. The surface to which the track is fixed must not be curved.
3. Install the door
Lay the bottom track on the floor, offsetting it about 27 mm from the door face (inwards). Use a Philips screwdriver and the adjusting bolt to move bottom rollers out about 10 mm. Fully insert the door leaf in the top track, taking care not to damage the bottom rollers, then align the bottom end of the door leaf with the bottom track and slowly lower the leaf, letting the rollers snap into the track guides.
Advice: Before you install the doors, put a cardboard sheet on the bottom track to prevent damage to track surface. When the doors are already in position, remove the protective cardboard.
4. Install the bottom track
Use a level to make sure the door is exactly plumb; move the bottom track as necessary. Check if the door travels smoothly along the entire width of the opening. Having precisely set the bottom track, fasten it to the floor. Having installed the track, put the other door leaves in their respective tracks.
Advice: Before you fix the bottom track, make sure that it is positioned exactly parallel to the top track. With soft floor covering, before you fix the bottom track, cut out a strip of about 55 mm in width and replace it with a 55 mm timber batten. Alternatively, put a 100 mm floor batten between the floor covering and the bottom track. Avoid applying excessive force when tightening screws to prevent track deformation. Use flat -head screws for best results.
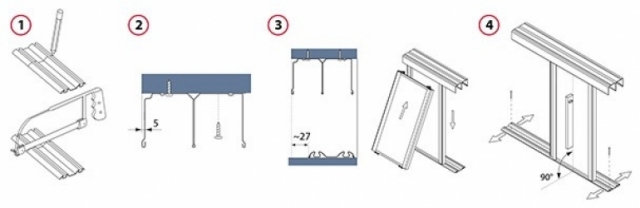
5. Adjust door position
Adjust door position by means of a Philips screwdriver and the adjusting bolts in the bottom rollers so that the doors fit tightly against the wall along the entire length. Door-to-floor clearance is adjustable between 10 and 40 mm (2 to 32 mm from the bottom track).
1. Installation of the universal soft closer in aluminium systems
Fasten the universal soft closer 09923X to the narrow rail by means of adapters and 3.5 x 23 screws (aluminium system soft closer accessories). Having fastened the closer, release the activator on the door, so it sits inthe position shown, then measure the distance “X” from the closing edge of the door.

2. Installation of the soft closer trigger
Screw the activator plate into the track so that the bar is the same distance from the wall (“X”). First screw the main plate to the track, and then a single screw through the piece that rotates down to hold it up in position. This last single screw and the grub screw allows you to adjust the height of the bar if required.
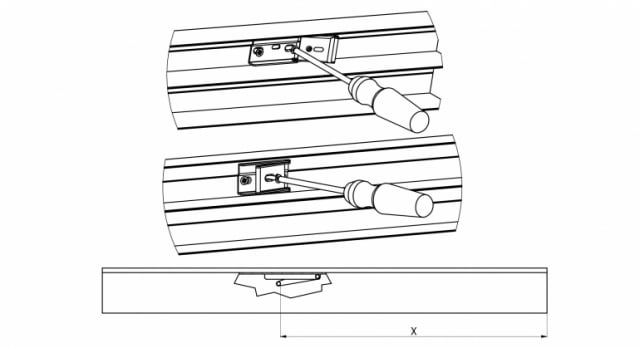
Install the door and adjust the height of the door, so the soft close unit meets the activator plate.